Last Updated on July 7, 2022 by Ellen Christian
Check out these easy glass painting ideas. Learn how you can create some of these glass jar painting ideas easily with this secret tool.
Posts may be sponsored. This post contains affiliate links, which means I will make a commission at no extra cost to you should you click through and make a purchase. As an Amazon Associate I earn from qualifying purchases.
Easy Glass Painting Ideas
Here are glass painting ideas that even a novice can do. I love the look of glass painting. I’ve tried it a few times, but I have found I’m not good at it.
I cannot draw or paint things that look like what I want them to. My people look like stick figures. My flowers look like blobs of color. I wanted to find glass painting ideas that would let me upcycle plain glass jars easily.
I love the look of the painted glass canisters, wine glasses, and jars I see in fancy home stores. They tend to be expensive, so I wanted to create my own. Here are a few glass painting ideas that work for me.
What kind of paint will stick to glass?
Acrylic enamel paints will stick to glass jars. If you are not using liquid fill glass paint, look for acrylic enamel paints. It sticks to various surfaces by creating a hard shell to lock in the color.
Is there a trick to painting on glass?
There isn’t a trick. But the best way to make it work is to have a very light touch when using the brush. Glass paint takes quite a while to dry. You must not touch it or try to paint over it until it dries. This is also true with the Martha Stewart liquid fill glass paint.
How can I do glass painting at home?
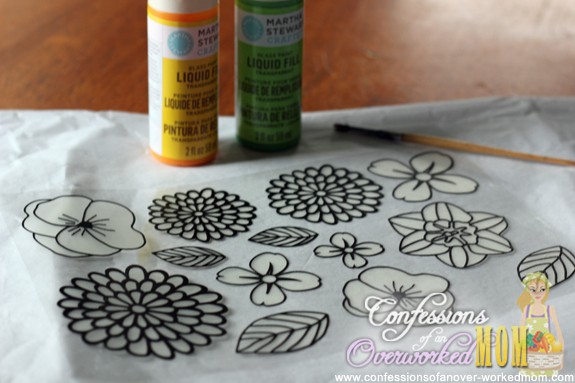
The Martha Stewart Crafts paintable clings make glass painting easy. You can do any of these easy glass painting ideas at home with the correct clings. I love these butterflies and flowers. Or these birds and flowers are gorgeous as well.
How do you prepare glass for glass paint?
Wash the glass in warm soapy water to be sure it’s clean. Let it dry completely. Then, use rubbing alcohol on a cotton ball and rub it all over the entire glass to remove any residue.
Tips for painting on glass
- Shop second-hand. At thrift stores, you can find many pretty glass jars, wine glasses, glass canisters, mirrors, and picture frames. The prices tend to be very affordable. Just make sure the item isn’t cracked or scratched.
- Mix and match. You don’t need to have six identical wine glasses to create a project. You can have slightly different glasses and paint them all with coordinating designs to tie them together.
- Go with a geometric design. It doesn’t take as much skill to create a series of polka dots on your glass jar as it does to paint a rose or a horse. If you are a beginner, start with the basics.
- Use home stores as inspiration. If your favorite color is turquoise, search the home stores for inspiration for turquoise designs. Use that as a starting point for something you’ll enjoy.
- Use paintable clings as a guide when you paint. Paintable clings can be painted over and removed when you want your decor to change. The outline of the cling serves as a template of sorts to keep your painting neat. That way, my flowers look like flowers.
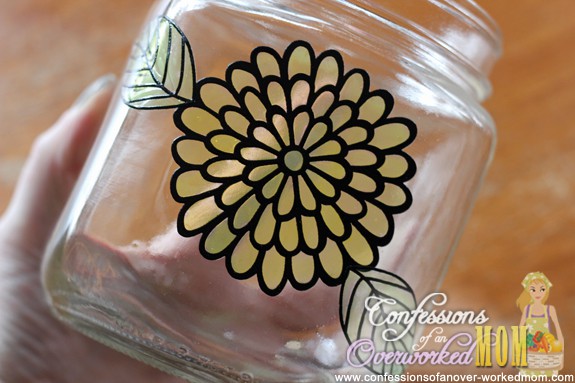
I decided to upcycle a glass jar using a few of these glass painting ideas. A friend gave me the jar and used it in the bathroom to store cosmetic wedges. I wanted to add a bit of spring to my home since I am so tired of all the winter snow. I thought a few colorful flowers would be a great idea, but the ones I paint by hand don’t look like flowers.
Supplies to paint on glass
- Martha Stewart Crafts Paintable Clings Butterflies and Blossoms
- Martha Stewart Glass Paint Liquid Fill #33203 Key Lime
- Martha Stewart Glass Paint Liquid Fill #33214 Raincoat
- Glass jar, canister, or other glass or ceramic item to upcycle
How to paint on glass with clings
- Make sure your glass surface is clean, dry, and smooth. Glass paintable clings can be used on nonporous glass or ceramic surfaces.
- Plan your design and ensure you know where you want the clings to go and that they will fit before you begin.
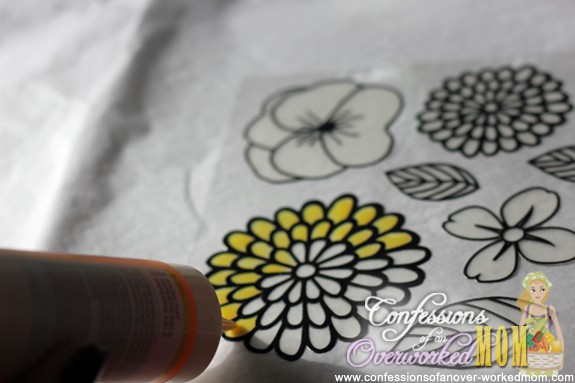
- Place the cling on a flat surface and fill in each open area of the cling using the glass paint liquid. Work on small sections and make sure to fill in each area completely.
- Continue painting until all areas of the cling are filled in. Use a paintbrush for small areas or the tip of the paint bottle in larger areas.
- Let the liquid fill glass paint dry completely.
- Carefully peel off the dried painted cling from the backing sheet.
- Position it where you want it on your glass or ceramic surface and press gently to smooth it.
- Wash all of your tools.
- Remember, these are for decorative purposes only. They are not dishwasher safe. You can carefully and lightly wipe them with a damp cloth to clean them.
Do you have any glass painting ideas that I’ve missed? Have you tried glass painting clings before, or do you paint freestyle?
More glass painting ideas
- Vintage look glass jars
- Wine glass centerpiece
- Ombre stemware
- Confetti champagne glasses
- Painting glass votive candle holders
- Decoupage on glass
- Glass etching
- Ideas for decoupage
Painted Glass Jar Using Clings

Check out these easy glass painting ideas. Learn how you can create some of these glass jar painting ideas easily with this secret tool.
Materials
- Martha Stewart Crafts Paintable Clings Butterflies and Blossoms
- Martha Stewart Glass Paint Liquid Fill #33203 Key Lime
- Martha Stewart Glass Paint Liquid Fill #33214 Raincoat
- Glass jar, canister, or other glass or ceramic item to upcycle
Tools
- paint brush
Instructions
- Make sure your glass surface is clean, dry, and smooth. Glass paintable clings can be used on nonporous glass or ceramic surfaces.
- Plan your design and ensure you know where you want the clings to go and that they will fit before you begin.
- Place the cling on a flat surface and fill in each open area of the cling using the glass paint liquid. Work on small sections and make sure to fill in each area thoroughly.
- Continue painting until all areas of the cling are filled in. Use a paintbrush for small areas or the tip of the paint bottle in larger areas.
- Let the liquid fill glass paint dry completely.
- Carefully peel off the dried painted cling from the backing sheet.
- Position it where you want it on your glass or ceramic surface and press gently to smooth it.
- Wash all of your tools.
- Remember, these are for decorative purposes only. They are not dishwasher safe. You can carefully and lightly wipe them with a damp cloth to clean them.

Ellen is a busy mom of a 24-year-old son and 29-year-old daughter. She owns six blogs and is addicted to social media. She believes that it doesn’t have to be difficult to lead a healthy life. She shares simple healthy living tips to show busy women how to lead fulfilling lives. If you’d like to work together, email info@confessionsofanover-workedmom.com to chat.

Very cute and it looks so simple to make as well.
KC
Thanks! It really was easy!
So pretty!
Thanks, Diana. I love flowers!
Super Sweet Craft,
Thanks for sharing on Tutorial Thursdays.
I hope to see you again this week for some more amazing fun 🙂
x
Natalie
http://www.marigoldsloft.blogspot.com
Thanks so much. I’ll try to stop by again!
ooooooooooooooooooooo… this looks gorgeous Ellen! You also make it seem so easy. Once I feel a little more comfortable in my new found craftiness I may try this out.
Thank you! The clings really do make it very easy to paint. Trust me. I have no painting talent at all.
Ellen, this came out beautifully! I just love your glass painting!
Thanks so much, Kendra. The clings make it easy!
That’s so pretty! I never though to paint on a glass jar before. I have a ton sitting around my house and definitely want to do this this week.
Thanks so much. There are tons of possibilities!
Beautiful! I can relate to the woes of trying to paint something recognizable on glass , so this is my kind of project!
I’d love to have the skill to paint freehand but until I do, these work great!
That is beautiful! I have used vinyl to decorate glass. Never painted.
Hopping by with WSM Blog Hop!
http://agutandabutt.blogspot.com/
Thanks so much, Betty! I was surprised how easy it was to do!
Wow, what a cool idea! Love the way those came out!
Thanks so much, Dawn. They were really easy to use.
Wow! Very pretty…such a great recycle/upcycle idea!
I did not know about the Martha Stewart paintable clings…that makes this project a more likely prospect for me and my limited painting abilities!
I found you through the Diana Rambles: Pin Me Linky Party and have pinned this great idea!
Thanks so much!
Lisa H.
Thanks for stopping by. The clings really do make it much easier.
That looks like a lot of fun – I have some glass paint that I have been meaning to use. The clings you have make it seem much easier to do, though.
It was fun. Unfortunately, I have no real painting skill so the clings are really good for me.
I have never tried these painting clings but am going to try them! Pinning this post from Diana Ramble’s party. Love this!
They really are super easy to use!
I love any craft that a novice can do, since I’m barely even at that level with talent, lol! That is so pretty, and it does look easy enough. Thanks!
I’m sooooo NOT crafty. But I feel like I should do more of this as an outlet and to encourage my son’s artistic side.
That turned out really pretty!
I’ve actually painted on glass jars before, made some beautiful creations (with A LOT of practice), but this IS MUCH simpler, no more “mistakes”, erasing, do overs, unfulfilled “happiness” because that petal didn’t come out right. VERY NICE!
I just love the way this turned out! Next time I’m at the craft store, I’m definitely looking for that kit. If you haven’t already, I’d love if you’d come join my How To Tuesday link party, too.
http://housewifehowtos.com/link-party-2/how-to-tuesday-link-party-10/
It is so beautiful and I have some glass bottles that I really want to personalize.
that is really pretty. I will have to keep my eyes open next time I am at the craft store!
That looks pretty easy and fun!
Beautiful!! I’ve never heard of those, have to look into now!! Pinned & Tweeted!!