
Last Updated on March 15, 2022 by Ellen Christian
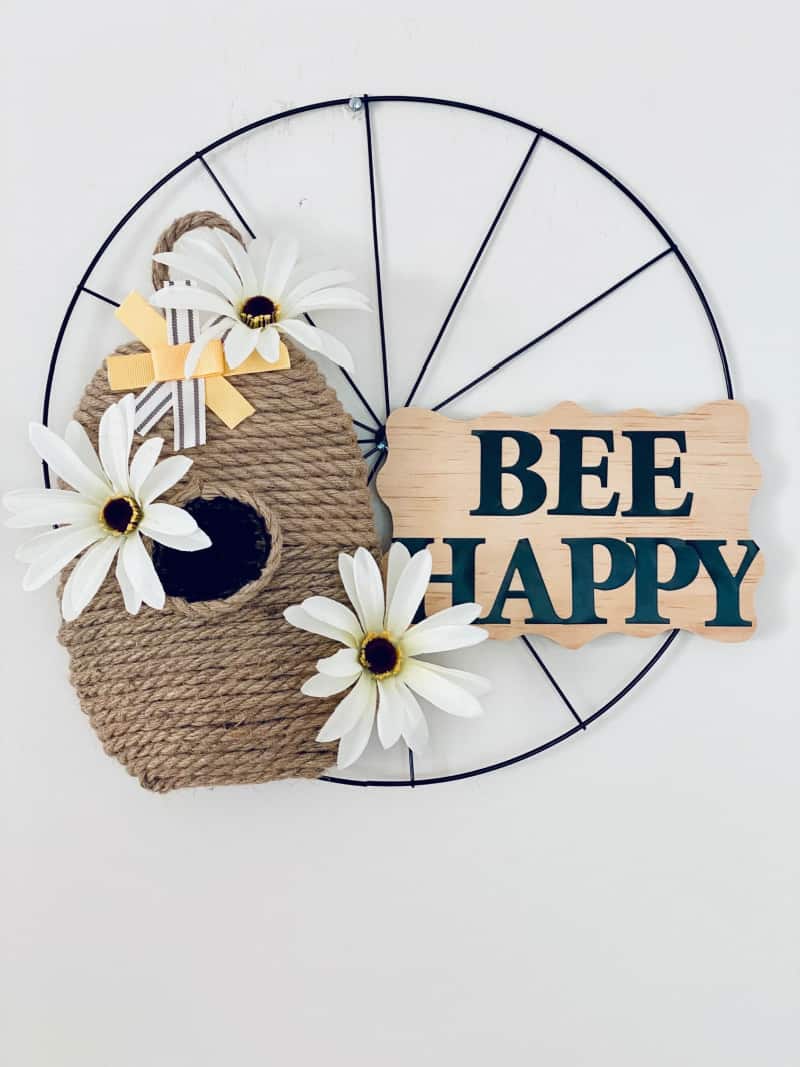
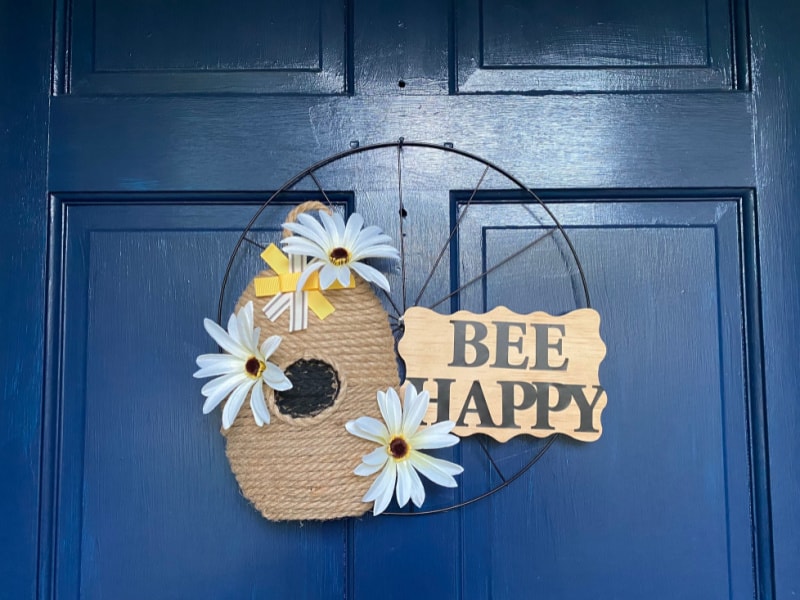
Check out this DIY Bumble Bee Wreath! If you’re looking for a summer wreath, this is a gorgeous idea for your front door.
Posts may be sponsored. This post contains affiliate links, which means I will make a commission at no extra cost to you should you click through and make a purchase. As an Amazon Associate I earn from qualifying purchases.
DIY Bumble Bee Wreath
I love how summery this bumble bee wreath looks. I can just imagine a happy yellow bumble bee flying into his hive surrounded by summer flowers.
You can always add a wooden bumble bee to the outside of the beehive if you’d like to. Otherwise, enjoy the wreath as is with some bright summer flowers.
Can I display this bumble bee wreath outside?
This isn’t weather-treated. So unless you have an outdoor door to protect it from the rain, I would hang this indoors.
This door wreath will look pretty displayed indoors on a coat closet door or in the kitchen. Or, you can display it on your porch out of the weather.
The colors are bright and cheerful and perfect for a summer wreath.
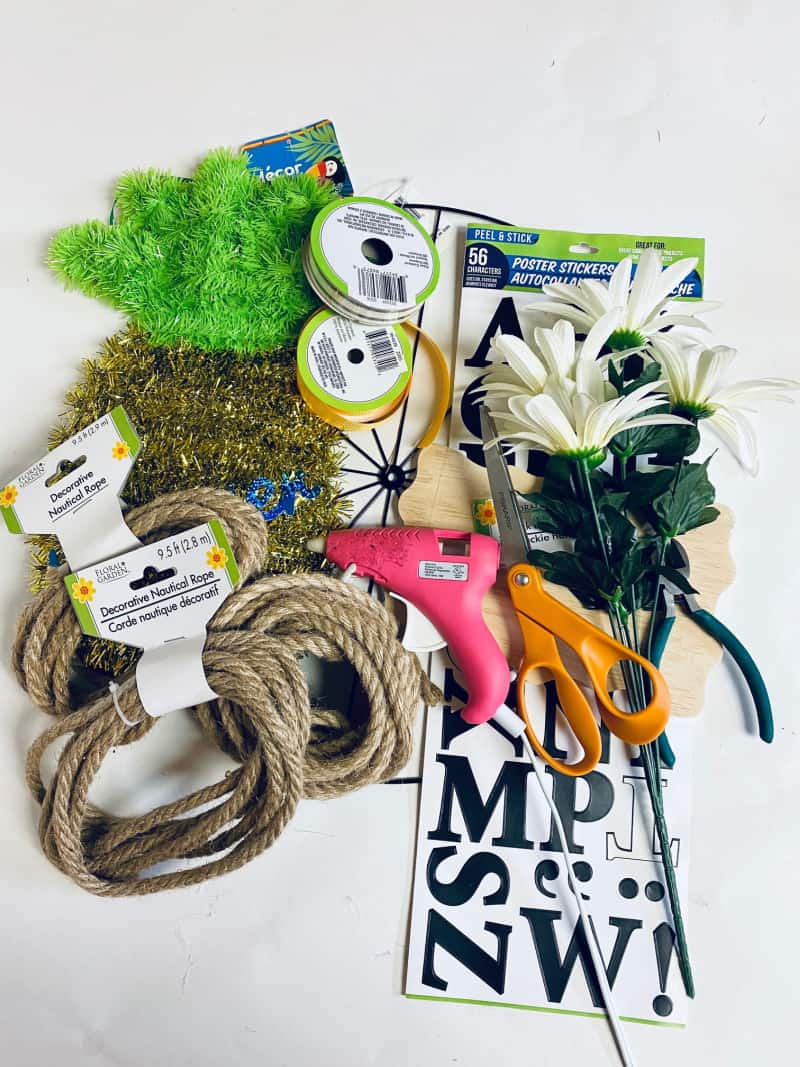
Supplies to make your summer wreath
This is what was used to make this bumble bee wreath. If you can’t find the exact supplies, you can substitute what you can find. The important things you will need are a round wreath form, rope, a wire pineapple, summer flowers, and a wooden plaque.
- Wheel Wreath Form
- Nautical Rope
- Scissors
- Hot Glue Gun/ glue sticks
- Pineapple wire wall décor (use this one from Oriental Trading)
- Wooden scalloped edge plaque for the sign
- Letter Decals
- Wire Cutters
- White or Yellow Sunflowers
- Black and white striped ribbon and yellow ribbon
- Paint Brush
- Waverly Ink Chalk Paint
Tips for decorating your bumble bee wreath
You can get creative with how you decorate your bumble bee wreath. If you want to add more design elements to it, you can certainly do that.
Just make sure that they are weather friendly if you want to add your wreath to the front door. If you hang it outdoors, you might want to use more wood and follow up with a clear glaze.
Here are a few suggestions:
- Yellow wooden bumble bee
- Burlap bow
- Yellow ribbon tails
- Deco mesh accents
- More summer flowers
- Ribbon bow
- Another type of sign
If this wreath is displayed indoors, you can use paperboard bumble bees. You could even set this on the mantel if you don’t have an indoor door that would work for your bumble bee wreath.
If you hang a bumble bee wreath on your front door, you will want to use a wood sign so that the moisture won’t warp the ornaments.
How do you make a bumble bee wreath?
Prep time: 30 minutes
Hands-on time: 60 minutes
Drying time: 120 minutes
- Start by adding the letter decals to the wooden sign.
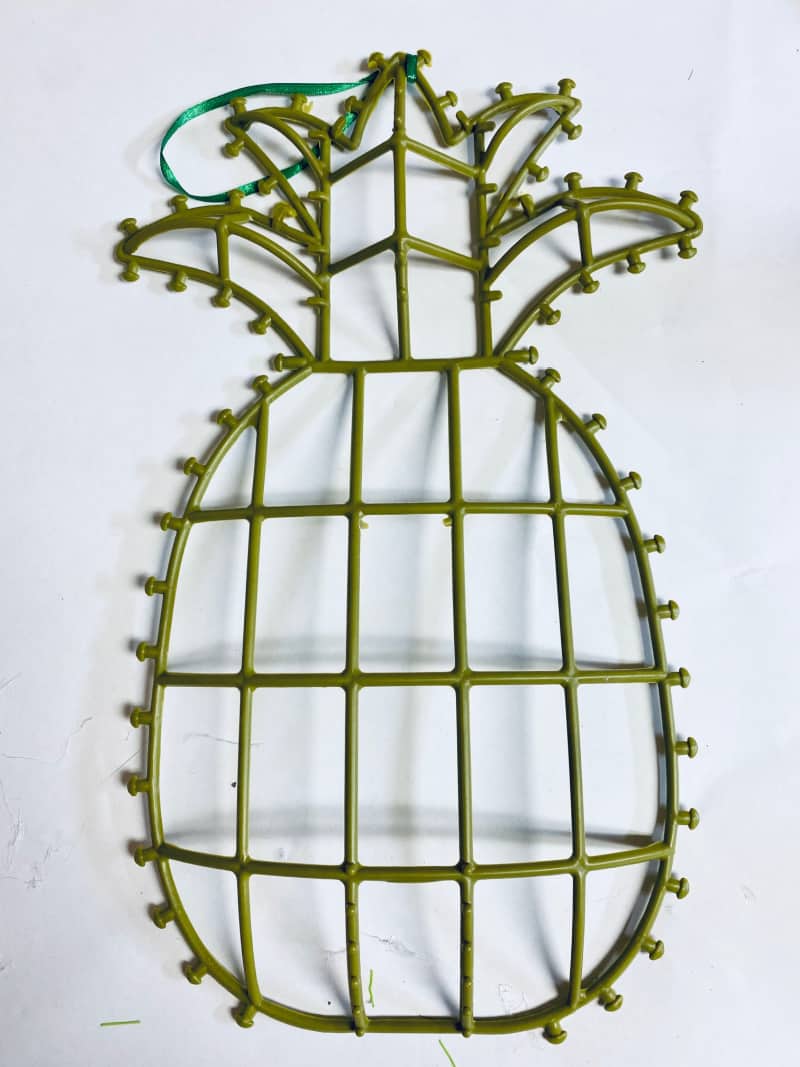
- Strip the wire pineapple form down to the base if it has added tinsel, fabric, ornaments, etc.
- Next using your wire cutters, cut the top part of the pineapple frame, then try and clip the edges that stick out from the pineapple so that the rope with have a tighter fit.
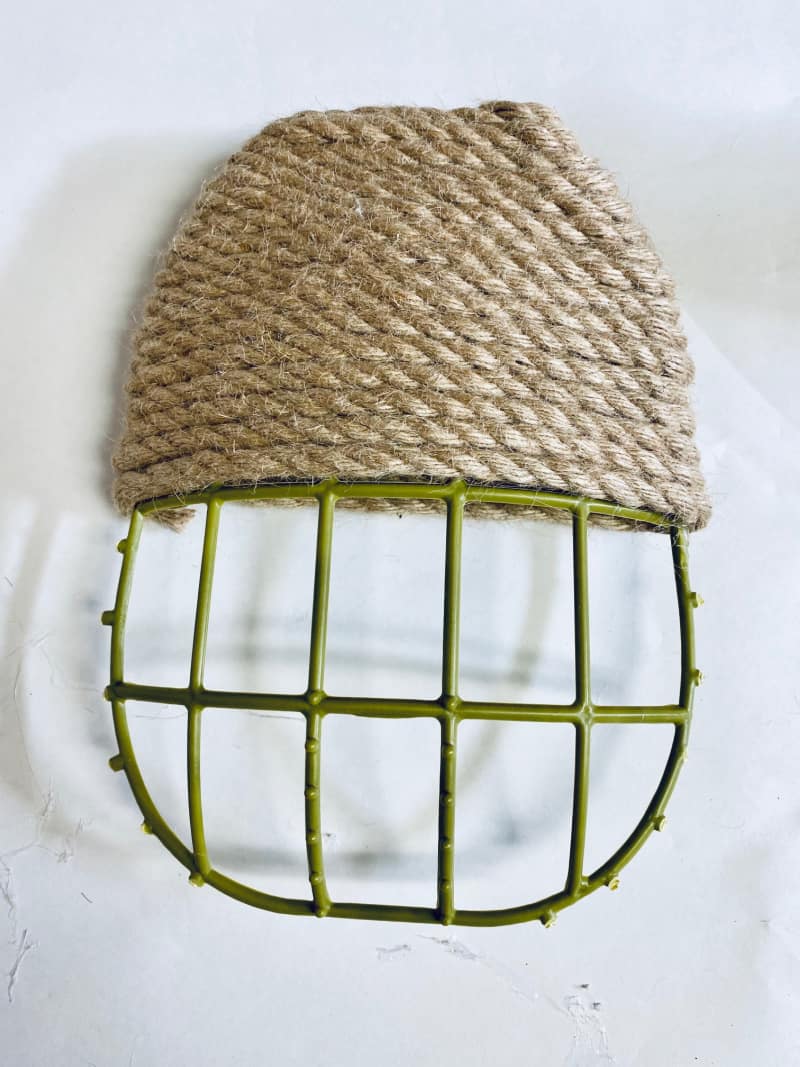
- Next, add some glue to the top piece, and add the nautical rope on top. Repeat this process, adding glue to the edges of the pineapple so that the rope has something on the frame to adhere to.
- Once you have reached the bottom, add some glue to the bottom piece and trim the end off. I tucked the little bit that was left inside of the other rope.
- Next cut a 4-inch piece of rope to create the top loop and glue.

- Cut another 4-inch piece of rope to create the circle for the beehive, attach the backside of the rope and add to the beehive.
- Cut (2) 4-inch sections of the yellow ribbon, and (2) 4 inches of the black and white ribbon. To make the bow place a yellow ribbon on the bottom, add a dab of hot glue, then a piece of the black and white ribbon, and repeat this for the other pieces. For the last piece that goes in the center, fold the piece so both ends meet flat, and attach. Review placement, then attach it to the beehive.
- Add other elements like a burlap bow, ribbon tails, fun little wooden bumblebees, or another rustic sign.
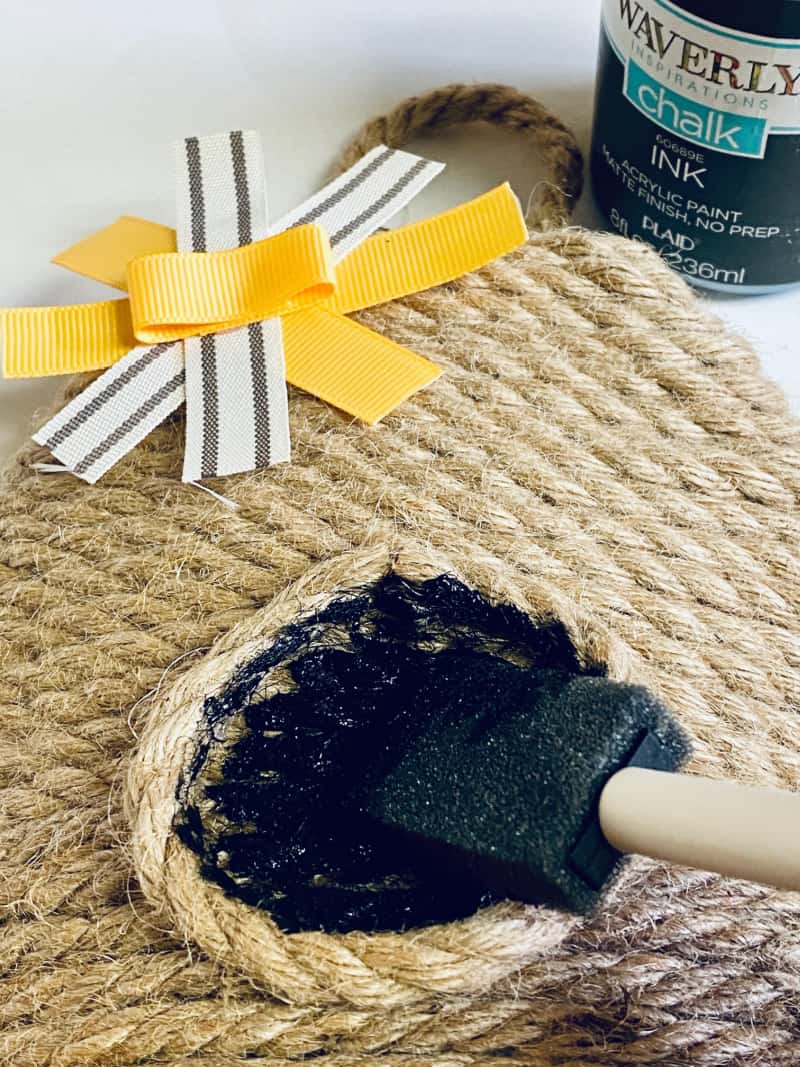
- Next using the Waverly ink chalk paint, or whatever black chalk paint you prefer, fill in the center of the round rope section. Let the center dry.
- To attach the beehive to the wheel wreath form, cut some leftover sections of rope and unravel it so that you have 3 pieces of rope.
- Then tie the beehive to the rope in a few spots to secure it.
- Next, pop the flower off from the stem and add some hot glue to the bottom of it to add it to the beehive. Be sure you use enough so that beehive attaches to the wreath form.
Can I add deco mesh to the bumble bee wreath?
If you want to add more color, you can create a deco mesh bow and attach it to the bottom of the wreath frame. Place it on the bottom half so it doesn’t hide the ribbon flowers.
You can use yellow. Or, use a combination of bright yellow, white, and black to fit the theme of your bumble bee wreath.
I really think that a burlap bow gives this a more rustic look. So you can always add that to the center of your bumble bee wreath if you enjoy that type of decor.
I love checking out the new products at the craft store. You never know what types of supplies you can find to add to your front door wreath. Make sure you search the clearance aisles too. Sometimes I find the best things there and it helps keep the price down.
If you don’t find what you need in stock, try looking online. You may need to wait till closer to summer to find everything you need in the stores.
More door wreath ideas
If you liked this bee door wreath DIY, you may want to make a few of these wreaths. Wreaths are such a fun and cheery way to welcome guests and family to your home.
- Cotton Wreath DIY
- Patriotic Door Wreath
- How to Make a Spring Wreath
- Americana Wreath
- Easy Advent Wreath
- Wreath Without a Wreath Form
- Apple Grapevine Wreath
Bee Happy Bumble Bee Wreath
Check out this DIY Bumble Bee Wreath! If you’re looking for a summer wreath, this is a gorgeous idea for your front door.
Materials
- Wheel Wreath Form
- Nautical Rope
- Scissors
- Hot Glue Gun / glue sticks
- Pineapple wire form
- Wooden scalloped edge plaque
- Letter decals
- White Black Eyed Susan flowers
- Black and white striped ribbon and yellow ribbon
- \Waverly Ink Chalk Paint
Tools
- Wire Cutters
- Paint Brush
Instructions
- Start by adding the letter decals to the wooden sign.
- Strip the wire pineapple form down to the base if it has added tinsel, fabric, ornaments, etc.
- Next using your wire cutters, cut the top part of the pineapple frame, then try and clip the edges that stick out from the pineapple so that the rope with have a tighter fit.
- Next, add some glue to the top piece, and add the nautical rope on top. Repeat this process, adding glue to the edges of the pineapple so that the rope has something on the frame to adhere to.
- Once you have reached the bottom, add some glue to the bottom piece and trim the end off. I tucked the little bit that was left inside of the other rope.
- Next cut a 4-inch piece of rope to create the top loop and glue.
- Cut another 4-inch piece of rope to create the circle for the beehive, attach the backside of the rope and add to the beehive.
- Cut (2) 4-inch sections of the yellow ribbon, and (2) 4 inches of the black and white ribbon. To make the bow place a yellow ribbon on the bottom, add a dab of hot glue, then a piece of the black and white ribbon, and repeat this for the other pieces. For the last piece that goes in the center, fold the piece so both ends meet flat, and attach. Review placement, then attach it to the beehive.
- Add other elements like a burlap bow, ribbon tails, fun little wooden bumblebees, or another rustic sign.
- Next using the Waverly ink chalk paint, or whatever black chalk paint you prefer, fill in the center of the round rope section. Let the center dry.
- To attach the beehive to the wheel wreath form, cut some leftover sections of rope and unravel it so that you have 3 pieces of rope.
- Then tie the beehive to the rope in a few spots to secure it.
- Next, pop the flower off from the stem and add some hot glue to the bottom of it to add it to the beehive. Be sure you use enough so that beehive attaches to the wreath form.

Ellen is a busy mom of a 24-year-old son and 29-year-old daughter. She owns six blogs and is addicted to social media. She believes that it doesn’t have to be difficult to lead a healthy life. She shares simple healthy living tips to show busy women how to lead fulfilling lives. If you’d like to work together, email info@confessionsofanover-workedmom.com to chat.