
Last Updated on June 21, 2023 by Ellen Christian
Wondering how to make salt dough magnets with oil? Check out this simple DIY and start making some fun crafts and gifts today.
Posts may be sponsored. This post contains affiliate links, which means I will make a commission at no extra cost to you should you click through and make a purchase. As an Amazon Associate I earn from qualifying purchases.

How to Make Salt Dough Magnets
Who else loves giving and receiving homemade gifts the most? I know I do. I have been wanting to learn how to make salt dough magnets so I can give a few as gifts. I have been a bit hesitant to try because stirring the dough can take some effort.
I have nerve damage in my right shoulder which makes stirring anything for more than a minute very painful. I recently received a Hamilton Beach Stand Mixer and realized that it could easily handle the job of mixing the salt dough.
Salt dough is a type of dough that is made of salt, flour, water, and oil. It can be dried which makes it perfect for making ornaments or magnets. Once you know how to make salt dough magnets, you can use this same recipe to create any other salt dough project.
How do you make saltdough?
Just follow this simple tutorial to make salt dough magnets. You can also make salt dough flowers or any other type of shape. You just need to use a different sized cookie cutter.
Salt dough recipe
- 2 cups flour
- 1 cup of salt
- 3/4 cup of water
- 2 tbsp vegetable oil
- cookie cutter
- parchment paper
- magnets
- ink pad for your magnets
- rolling pin
- Hamilton Beach Stand Mixer
Directions:
- Place the flour, salt, water and vegetable oil in your Hamilton Beach Stand Mixer. Mix with the dough hook and mix until the ingredients resemble dough.
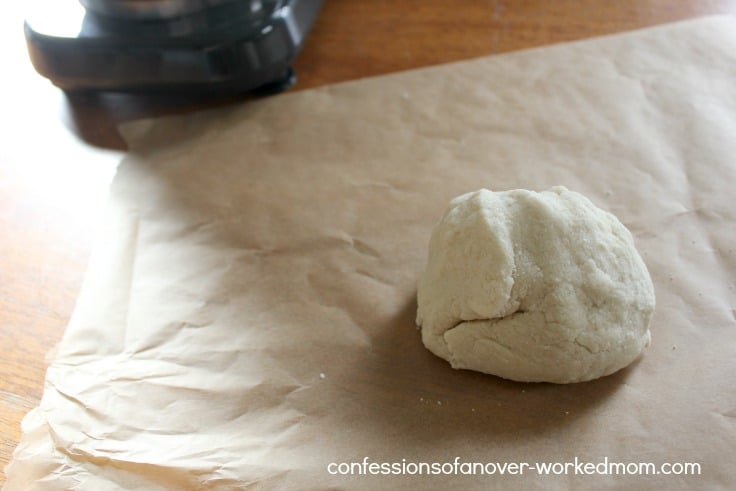
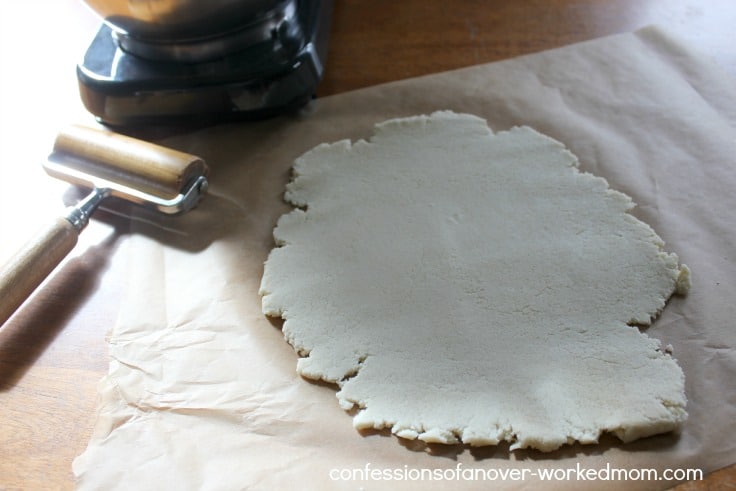
- Remove it from the mixer and place on parchment paper. Roll with rolling pin until about 1/4″ thick.
- Using a rubber stamp, stamp random patterns around the dough. You can do this with or without ink.
- Using a round cookie cutter, cut out several magnets from the stamped salt dough.
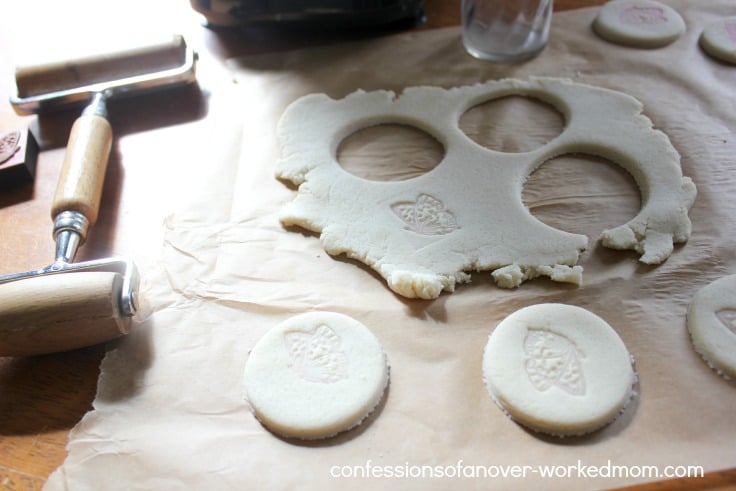
- Remove the excess dough. Place the parchment paper with cut out magnets on a cookie sheet.
- Heat in the oven to 180F and bake for about 3 hours to dry. Check frequently. You don’t want them to brown.
- Dough is done when you tap on it and it sounds hollow.
- If you need to, gently file the edges of the magnet to smooth them out.
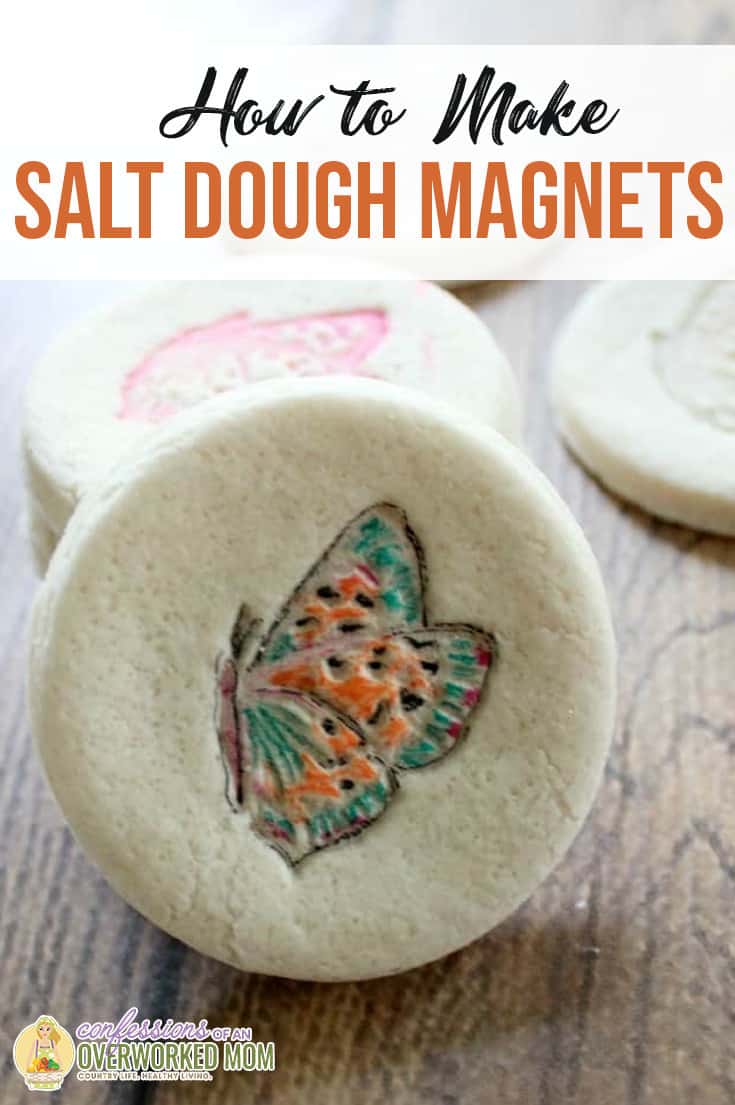
- You can try coloring them in with markers over the stamped design if you want.
- Let cool completely and attach the magnet back to the salt dough. I use the pre-sticky ones but you can use tacky glue if you want to.
What kind of paint do you use on saltdough?
Now that you know how to make salt dough magnets, you need to decorate them. You can skip the rubber stamps and instead paint the magnets or draw on them with markers if you’re artistic. I’m not really so the rubber stamps are much easier for me. Acrylic paints would be easiest but any type will work.
The Hamilton Beach Stand Mixer made the whole process so much easier for me. It comes with a flat beater, whisk and dough hook so I can use it for lots of different recipes and crafts. It has a 3.5-quart bowl and a 300-watt motor.
How long do salt dough decorations last?
If you keep them in a dry, dark place, they should last for years. If they get humid or you store them somewhere that is damp, they will mold. Make sure they are in a container with a tightly fitting lid. Now that you know how to make salt dough magnets why not make magnets for Father’s Day.

Ellen is a busy mom of a 24-year-old son and 29-year-old daughter. She owns six blogs and is addicted to social media. She believes that it doesn’t have to be difficult to lead a healthy life. She shares simple healthy living tips to show busy women how to lead fulfilling lives. If you’d like to work together, email info@confessionsofanover-workedmom.com to chat.
I would make my grandma’s special coconut cake. Yum.
I would make chocolate cherry cookies!
Id make Lemon Pie
Gluten Free chocolate chip, coconut cookie! lol
I would make Biscotti !!
cupcakes. who doesn’t love cupcakes?
I would make chocolate cake.
i would make a pound cake
I would make a huge cake first 🙂 I would also like to make cookies with my granddaiughter.
Chocolate cake !! the kids love it so much !
Oh I would make Gluten Free Chocolate Chip Cookies first!
Salt dough magnets. I already have some really cute stamps to use.
Gosh I’d be so excited to have one I’d probably be in the kitchen all day trying new things! The ornaments are so neat!
Salt dough magnets! I’m thinking we’d draw kitty cat faces on them. 🙂
I would make cookies and pizza dough
I would make is cheesecake.
Chocolate cake !!
Nice, but my kids would want cookies to eat instead. This one is kind of fun.
I would make cookies and cakes for the family and for friends.
I would make my mom’s cake roll!
I would make a cake! or some home made coconut oil body lotion!
I’d make an angel food cake with fresh summer strawberries!
I’d love to make mint Oreo cheese cake.
Cookies – – then bread =)
I’d make a cheesecake.
I would make divinity or amish potato bread.
probably sugar cookies
i would love to use this to make the carrot cake cupcakes that i make for my brothers birthday every year
Hi! The first thing I would do with the mixer is to make a creamy cheesecake. These mixers are really good are thoroughly and easily mixing cheesecake batter. Yummy! Thank-you!
Something decadent. Probably a cake of some sort. I’d have to go through my recipes!!
If I won, I would make some yummy cheesecake with my new mixer!
Cupcakes!!
I would make my favorite lemon poppyseed bread.
If I won this mixer the first thing I would make is oatmeal cookies with butterscotch chips.
I’d make these magnets! It’d be the perfect gift for my mom. I could do them of my daughter’s (my mom’s first granddaughter) little hands!
I would make cupcakes.
I would make peanut butte cookies.
I would love to make cookies
So many tasty foods I could whip up with this! I do not have a mixer so I would be beyond thrilled! First I would make some cupcakes and a cake ! Then off to try some yummy recipes! I don’t think I would leave the kitchen! Thank u for your generosity and good luck to all!
I would make a Chocolate Peanut Butter Icebox Cake. Thank you so much for the chance to win!
I would make cookies with my son with mine! 🙂
First thing I would make is cheesecake.
Cookies–all kinds of cookies
I am not really sure–a cake of some sort would be the first thing I do–just not sure which kind.
Choc chip cookies
Cinnamon rolls. I’ve been dying to make some since the new baby was born. 🙂
Your magnets turned out so gorgeously! I’d love to make some of my own or have my littles make some for our fridge!
I’d make dozens of cookies to catch up from my lazy winter of no baking!
I would make cookies.
The first thing that I would make is chocolate chip cookies! Those are my son’s favorite. Thank-you for a great #giveaway!
I would make the salt dough magnets! They are absolutely cute!
I love making salt dough ornaments. I think what got me was that salt dough state I had to make in 4th grade, it was so fun.
I would make a no bake cheesecake. Lots of pot lucks coming up next month.
Pizza dough!
I’d make some homemade bread or a cake from scratch. I haven’t made a cake without store bought mix in so long.
This would make the cinnamon oatmeal cookies I bake almost every week for Hubz’ lunch a lot easier.
a pound cake
I would make cookies, and cakes and all kinds of things!! Your craft is awesome too!
Beautiful, Ellen – you could make these so personal. First thing I would make if I won, Mom’s zucchini bread – yum!!
I would make peanut butter cookies. My family loves them but they are so hard to mix especially
when you have arthritis!
Chocolate chip cookies!