
Last Updated on April 24, 2023 by Ellen Christian
Learn how to make a clothespin wreath with this simple DIY. All you need are clothes pins, a hot glue gun, and a few simple craft supplies.
Posts may be sponsored. This post contains affiliate links, which means I will make a commission at no extra cost to you should you click through and make a purchase. As an Amazon Associate I earn from qualifying purchases.

Clothespin Wreath DIY
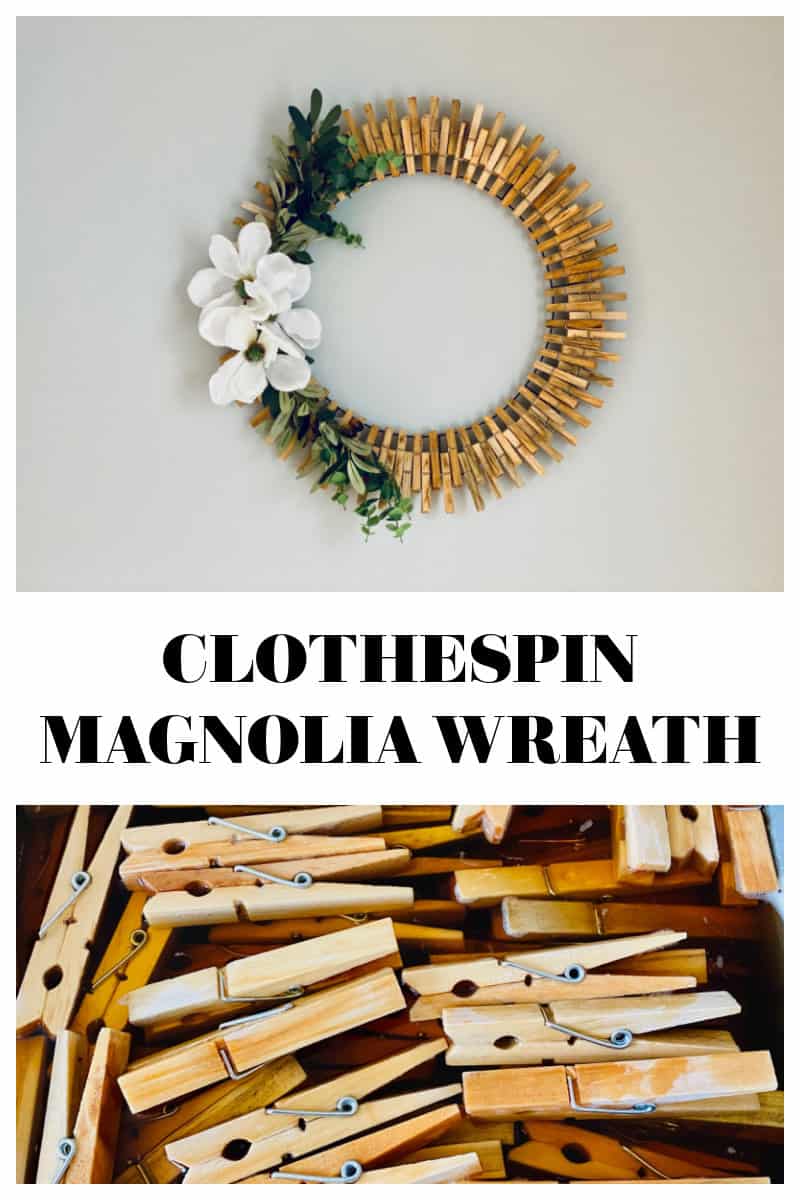
This Magnolia Clothespin Wreath is a simple DIY wreath you can make in an afternoon. Hang it on your front door or over your mantle for a super easy accent piece.
You can use the base of this clothespin wreath and customize it in any way you like. I added magnolia flowers to make a cute wreath. You can find them at Dollar Tree.
Sunflower clothespin wreath, etc.
But, you could easily make a sunflower clothespin wreath or a patriotic clothespin wreath by adding different flowers or accents.
How many clothes pins does it take to make a wreath?
This will depend on the size of the wreath form you use. This wreath project uses an 18″ wreath form from Dollar Tree and about 100 clothespins.
Can I use a different size wreath form?
Yes, you can. You may need to adjust the number of clothes pins.
Can I use spray paint?
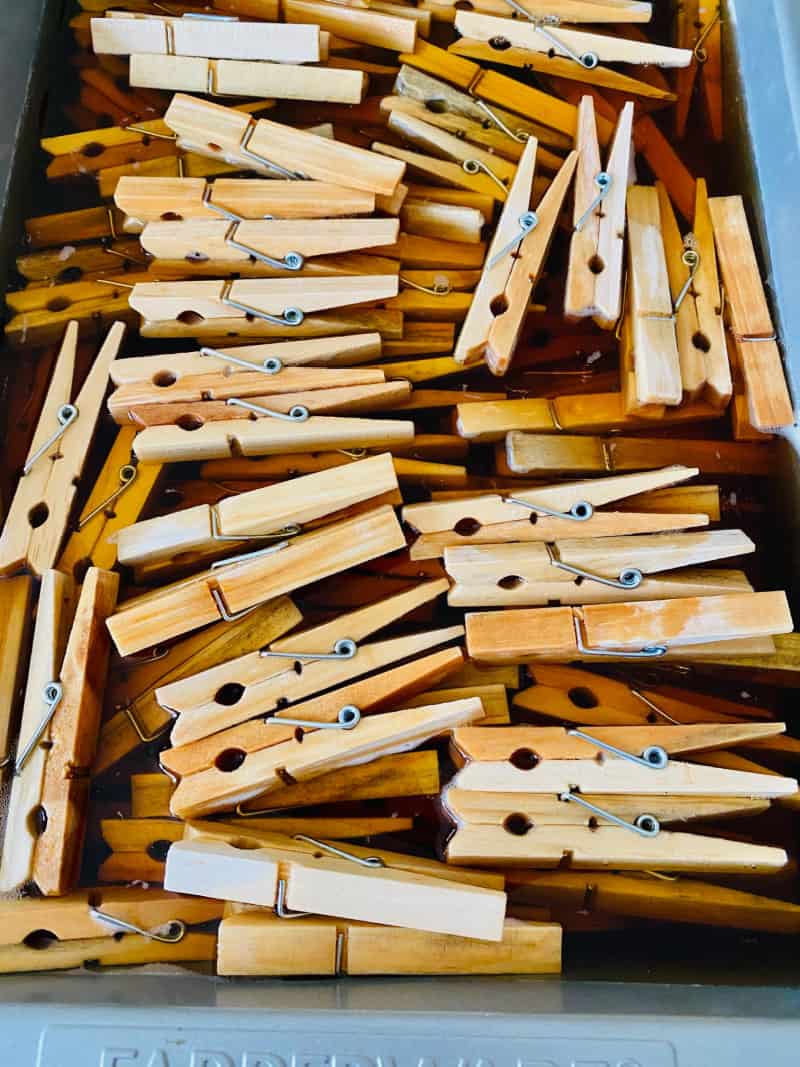
Yes, these clothespins have been soaked in coffee to give them an aged look. But, you can use spray paint instead of you want to.
This is a great idea if you want to use all the clothespins you’re not using for laundry. Try this DIYT clothespin wreath today.
What do you need to make a clothespin wreath?
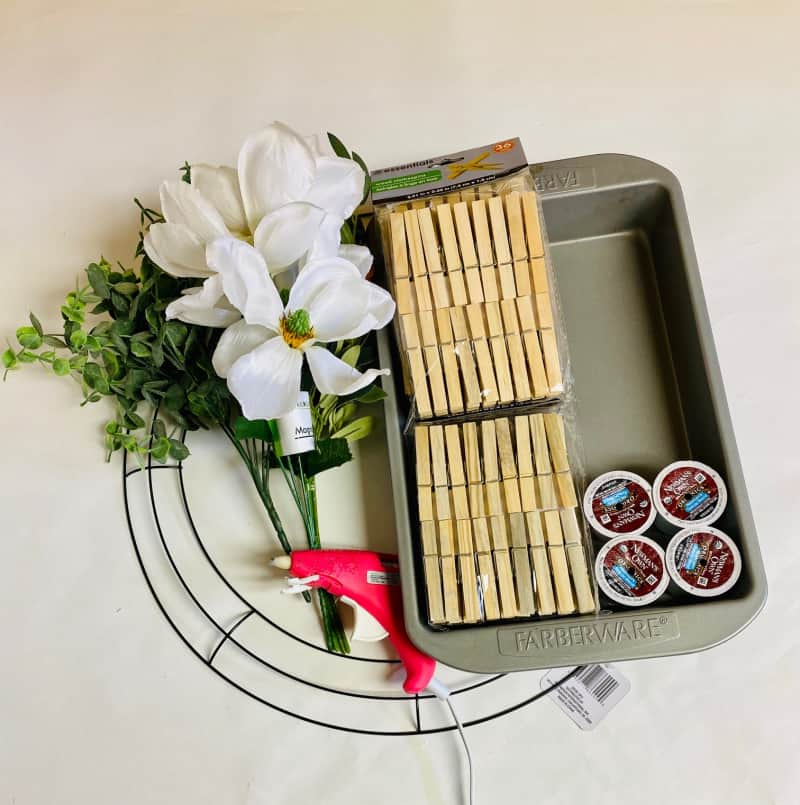
- 18 inch wire wreath form (Dollar Tree)
- 3 packages of clothespins (Dollar Tree 36 in a package) or 100 here.
- Hot Glue Gun/ Glue Sticks
- Coffee pods or coffee on hand
- Tray to let the clothespins soak in the coffee
- White Magnolia flower
- Fig bushel (Hobby Lobby, normally 8.99 but was 50% off)
- Eucalyptus sprig
- Spray paint (optional instead of coffee)
How to make a DIY clothespin wreath
- Brew some coffee. Let the clothespins soak overnight to make sure they absorb the coffee.
- After they have soaked for a good amount of time, lay them on a cookie sheet to dry. I put mine on a cookie sheet with parchment paper and put them in the oven for 2 hours at 200 degrees F to get them to dry faster.
- If you prefer, use spray paint on the clothes pins instead. Let the spray paint dry completely.
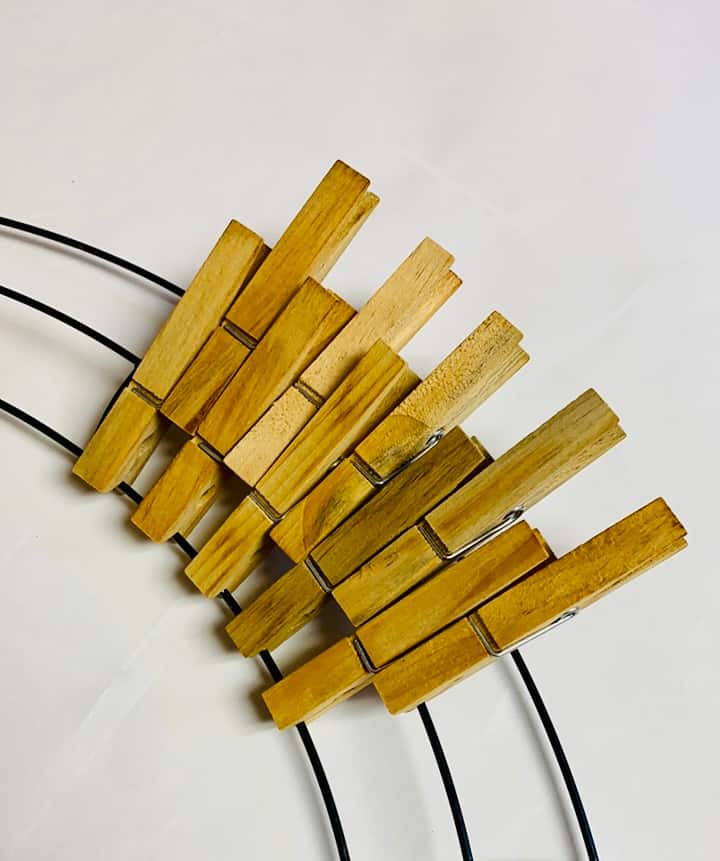
- Once they are dry you can start adding them to the wire frame.
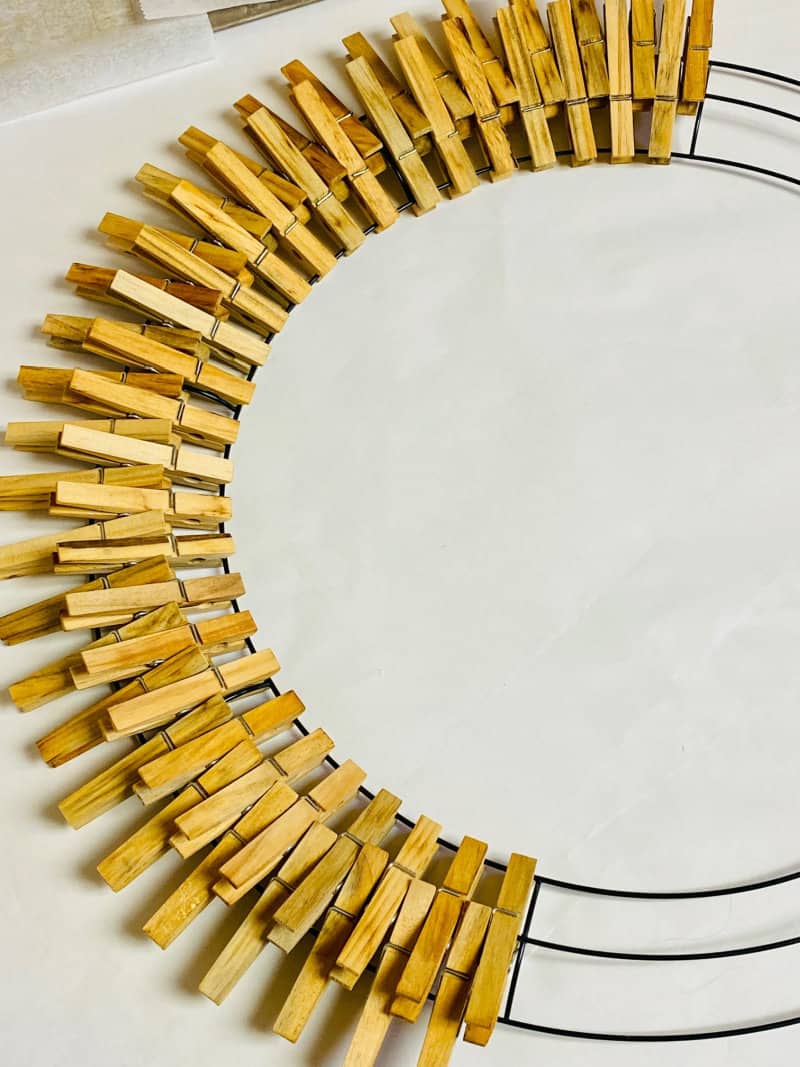
- Start by opening the clip and clipping it onto the first and second wire wreath form sections. For the next one you only clip the first part of the clothespin onto the second wire section. Repeat until you have the entire wire wreath covered. This will use all of the clothespins from the 3 packages.
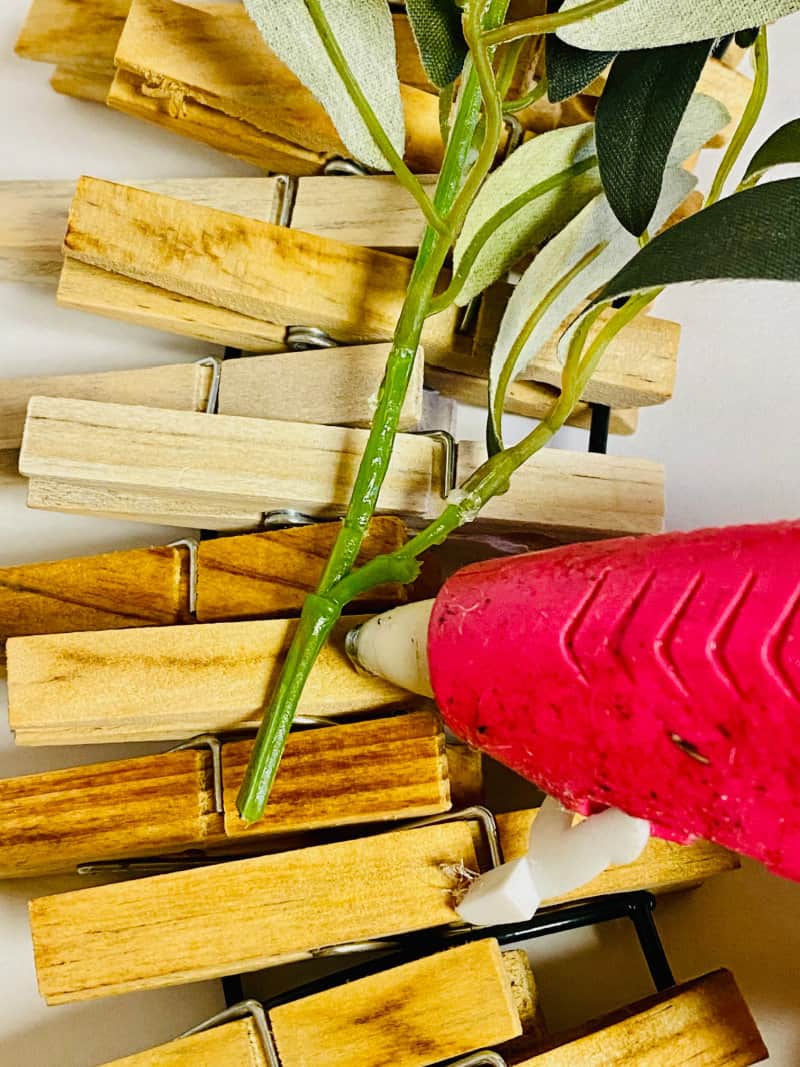
- Next using your wire cutters, cut the fig branches leaving just a few inches so that you can hot glue them down, pop the Magnolia flowers off the stems (you don’t need wire cutters for this), and with wire cutters cut 2 pieces of the eucalyptus branches off.
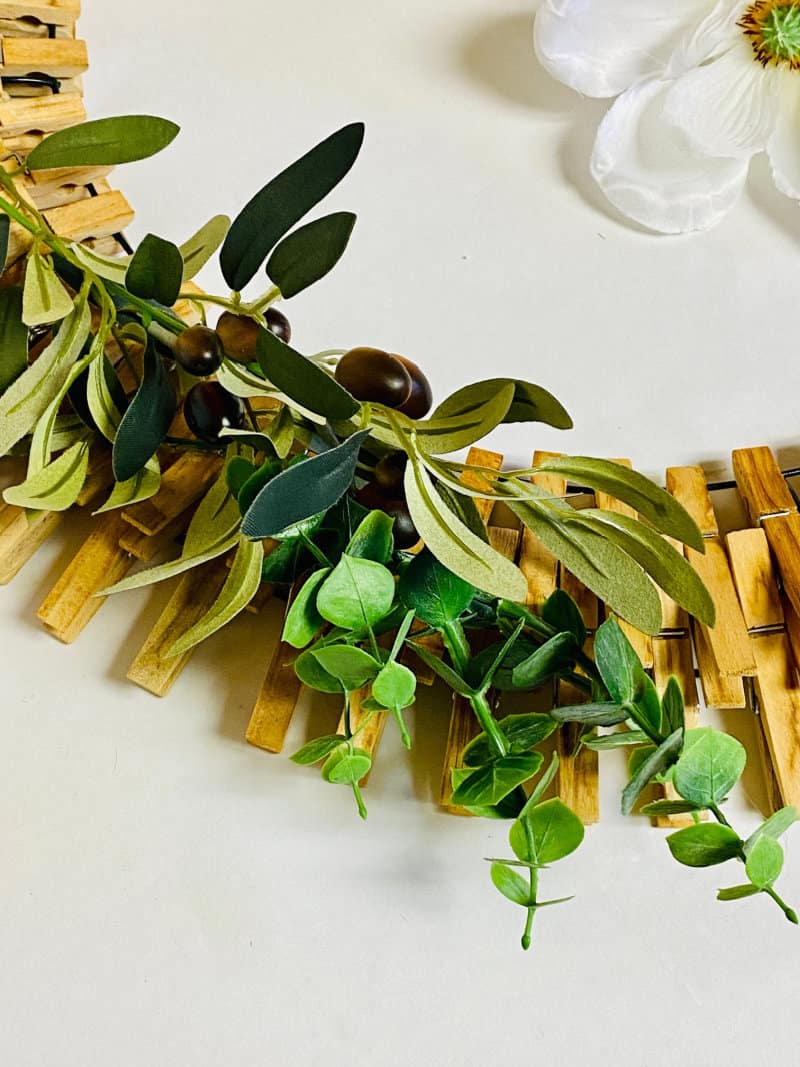
- Next start by hot gluing the fig branches down first, then add the magnolia flowers and finally add the eucalyptus pieces to the top and bottom sections.

Optional add-ons for other holidays
This cute clothespin wreath is such an easy project. You can easily add different accents for all the holidays and seasons. Here are some ideas you can use to decorate your wreath.. Check your craft stores or dollar store for more.
- Patriotic wreath with a blue ribbon for Independence Day
- Add burlap ribbon and pumpkins for Thanksgiving
- Hearts and pink ribbon for Valentine’s Day
- Green bow and green shamrocks for St. Patrick’s Day
- Halloween decorations
- Yellow sunflower wreath with twine for summer
- Use washi tape for an indoor clothespin wreath
- Add Christmas ornaments for a holiday wreath.
This beautiful wreath is one of the easiest wreaths I’ve seen. It’s a fun project that uses only a few basic supplies from the dollar store or craft store. Create one for every holiday.
Related Reading
Clothespin Wreath DIY
Learn how to make a clothespin wreath with this simple DIY. All you need are clothes pins, a hot glue gun, and a few simple craft supplies.
Materials
- 18 inch wire wreath form (Dollar Tree)
- 3 packages of clothespins (Dollar Tree 36 in a package)
- Hot Glue Gun/ Glue Sticks
- Coffee pods or coffee on hand
- Tray to let the clothespins soak in the coffee
- White Magnolia flower (Dollar Tree)
- Fig bushel (Hobby Lobby, normally 8.99 but was 50% off)
- Eucalyptus Bushel (Walmart)
- Spray paint (optional instead of coffee)
Tools
- hot glue gun
Instructions
- Brew some coffee. Let the clothespins soak overnight to make sure they absorb the coffee.
- After they have soaked for a good amount of time, lay them on a cookie sheet to dry. I put mine on a cookie sheet with parchment paper and put them in the oven for 2 hours at 200 degrees F to get them to dry faster.
- If you prefer, use spray paint on the clothes pins instead. Let the spray paint dry completely.
- Once they are dry you can start adding them to the wire frame.
- Start by opening the clip and clipping it onto the first and second wire wreath form sections. For the next one you only clip the first part of the clothespin onto the second wire section. Repeat until you have the entire wire wreath covered. This will use all of the clothespins from the 3 packages.
- Next using your wire cutters, cut the fig branches leaving just a few inches so that you can hot glue them down, pop the Magnolia flowers off the stems (you don’t need wire cutters for this), and with wire cutters cut 2 pieces of the eucalyptus branches off
- Next start by hot gluing the fig branches down first, then add the magnolia flowers and finally add the eucalyptus pieces to the top and bottom sections.

Ellen is a busy mom of a 24-year-old son and 29-year-old daughter. She owns six blogs and is addicted to social media. She believes that it doesn’t have to be difficult to lead a healthy life. She shares simple healthy living tips to show busy women how to lead fulfilling lives. If you’d like to work together, email info@confessionsofanover-workedmom.com to chat.